
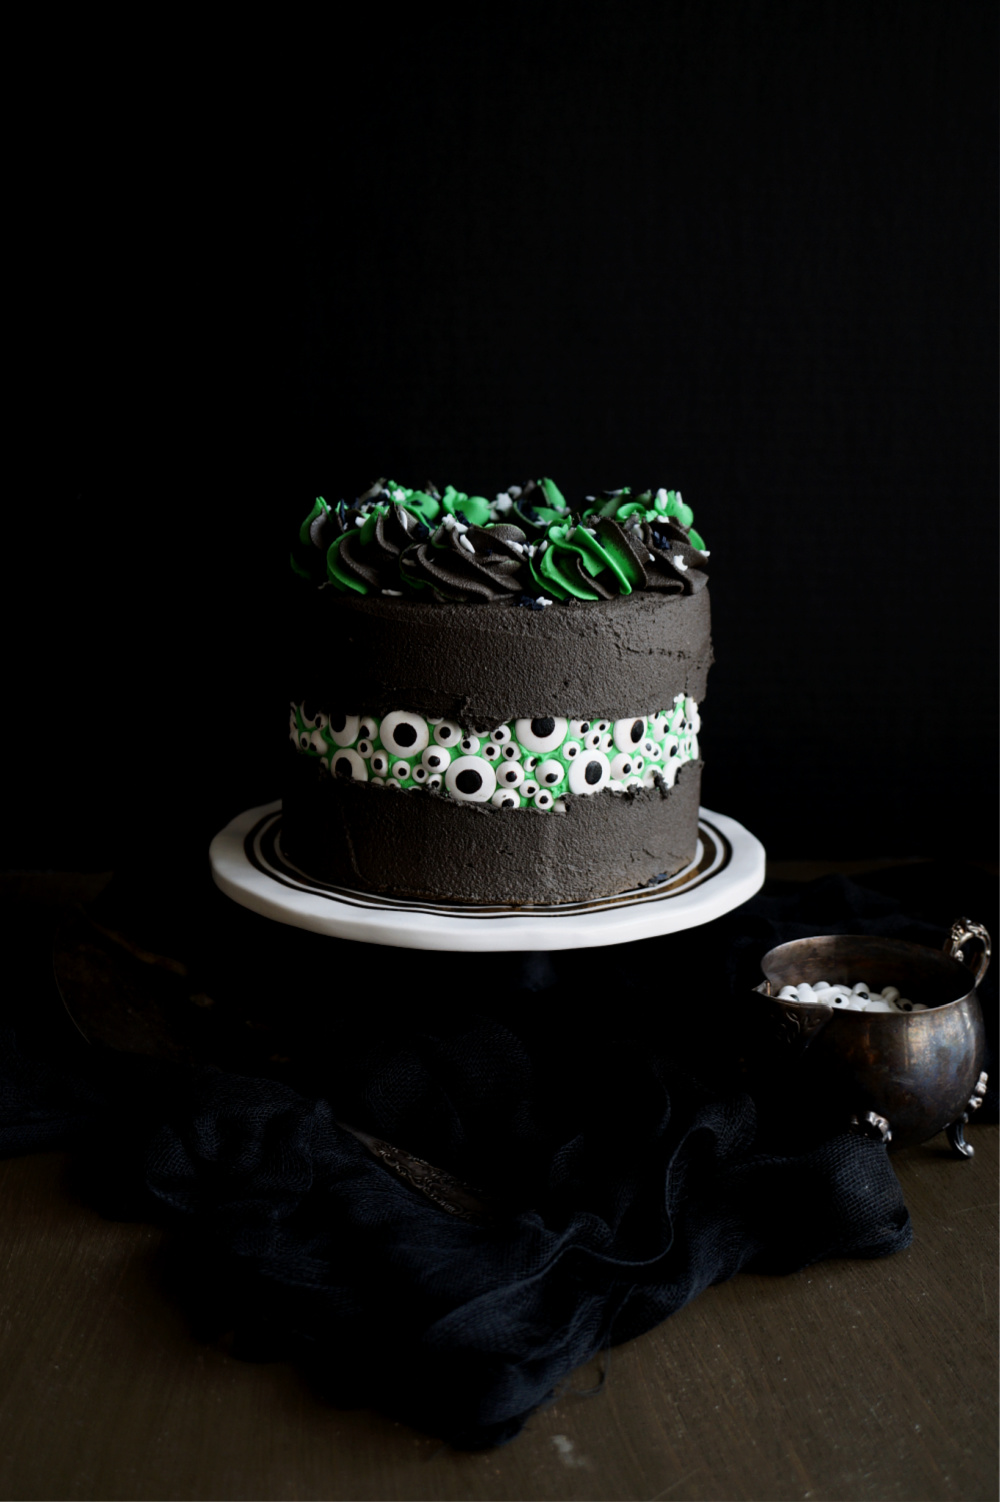
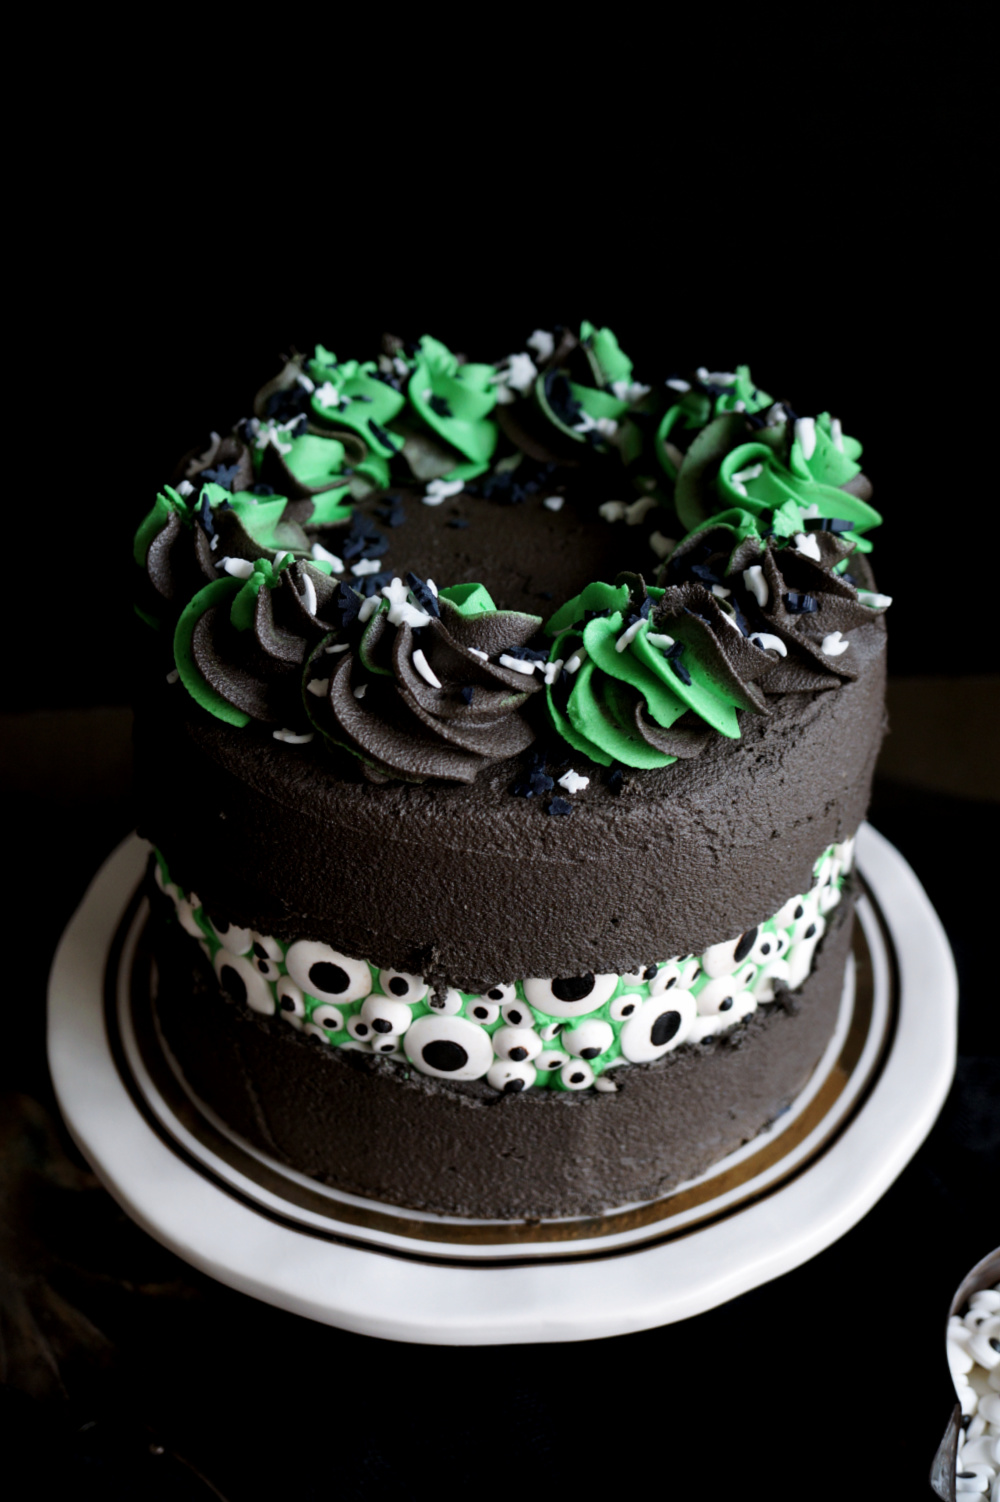
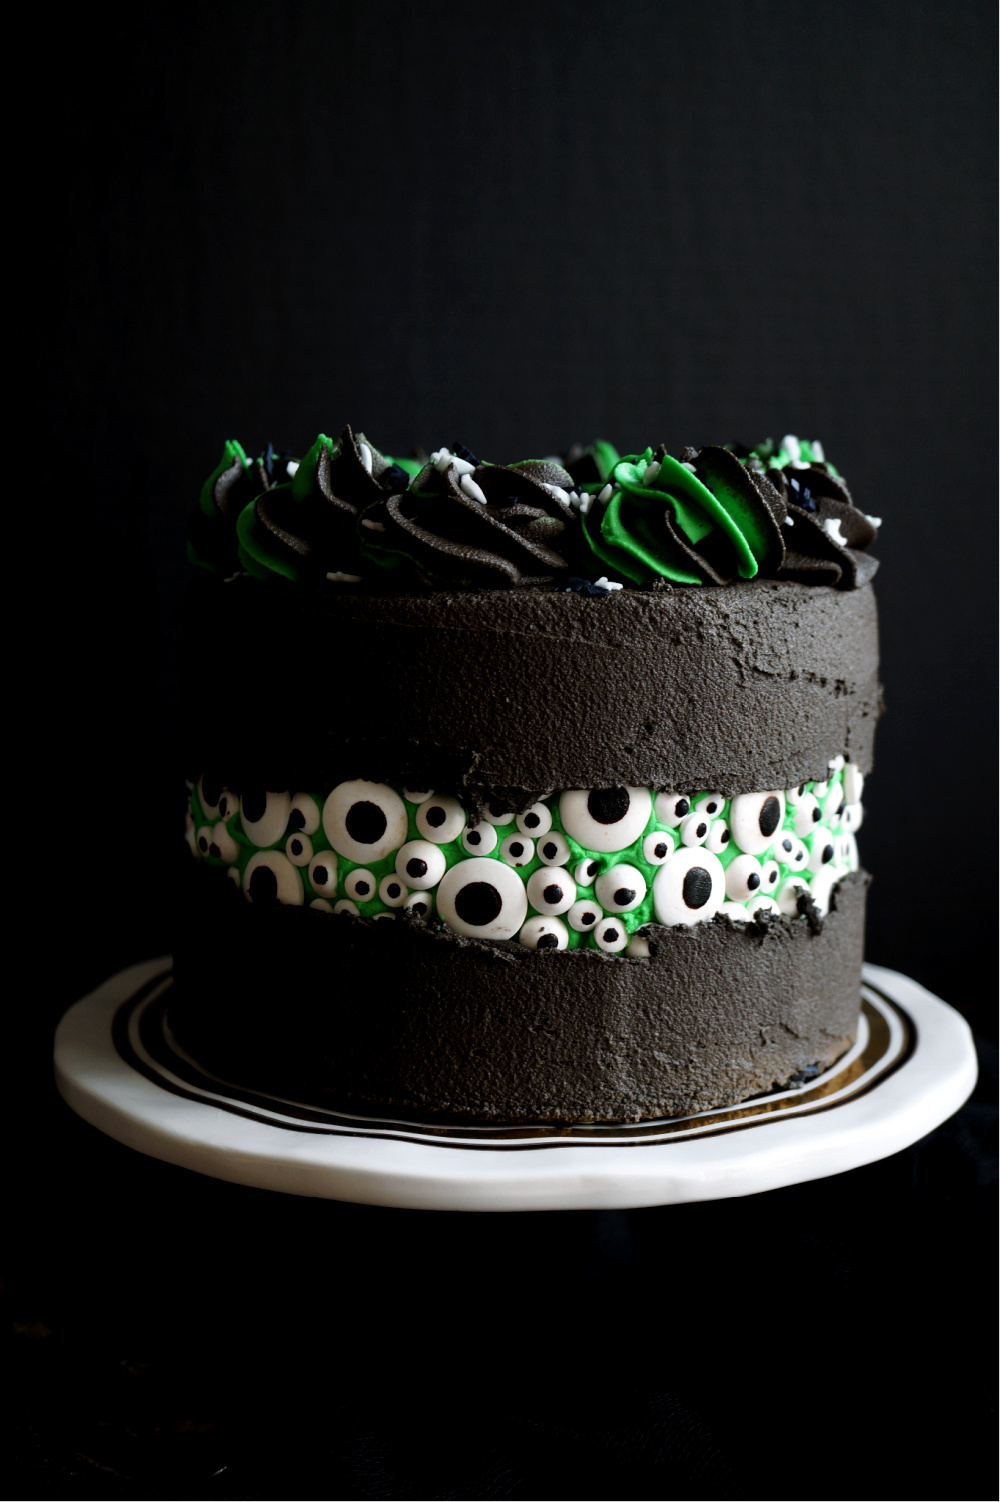
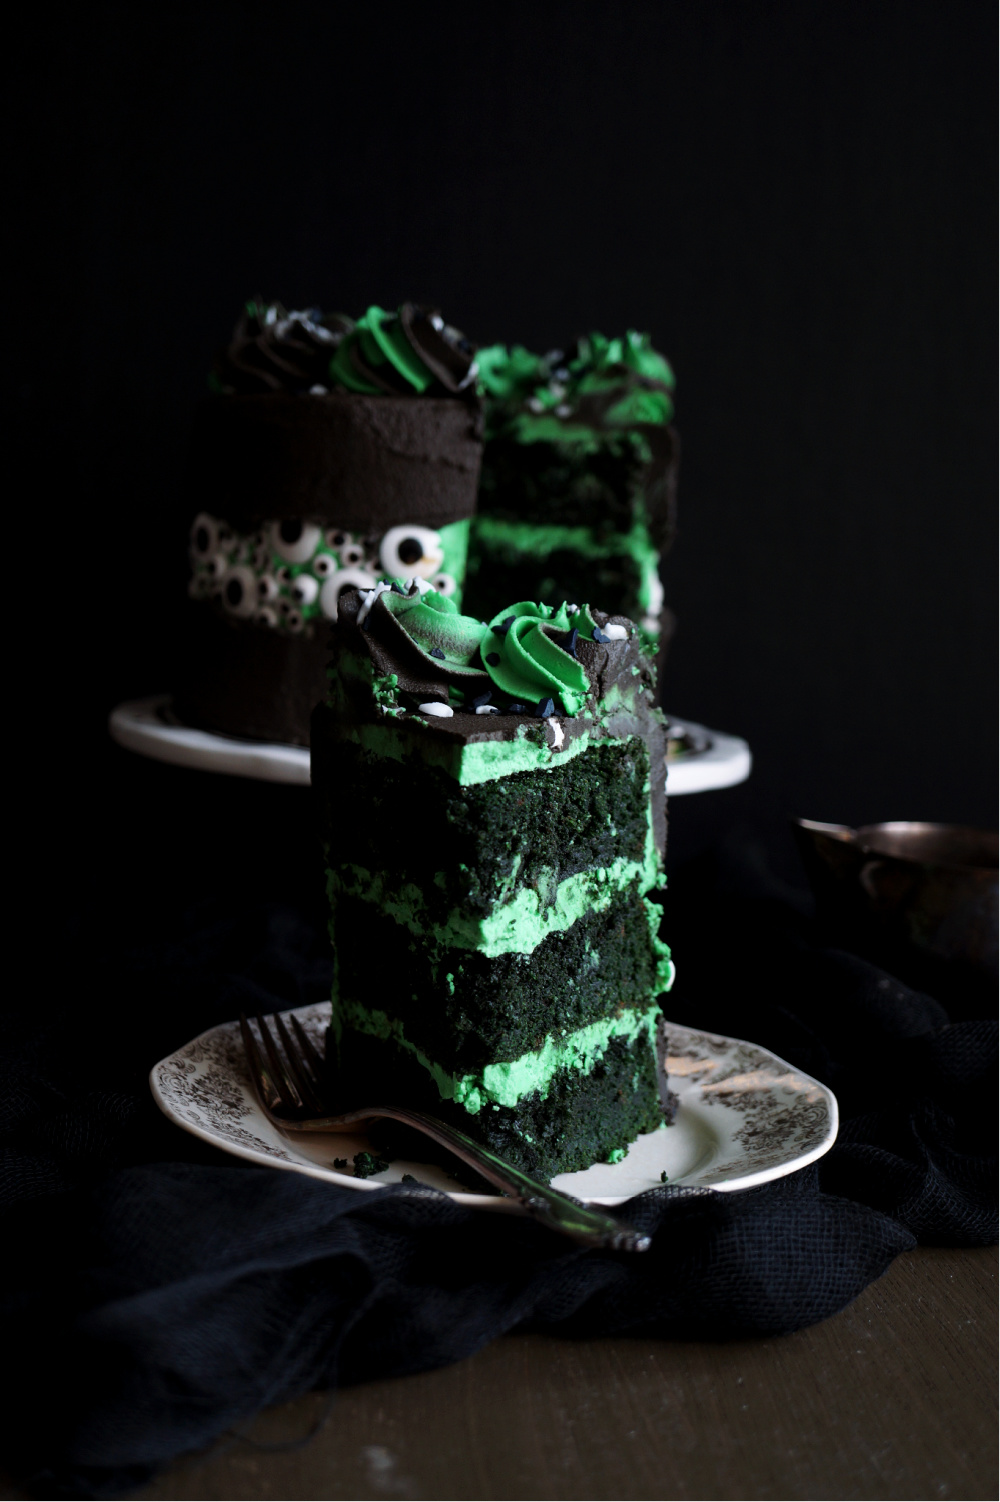
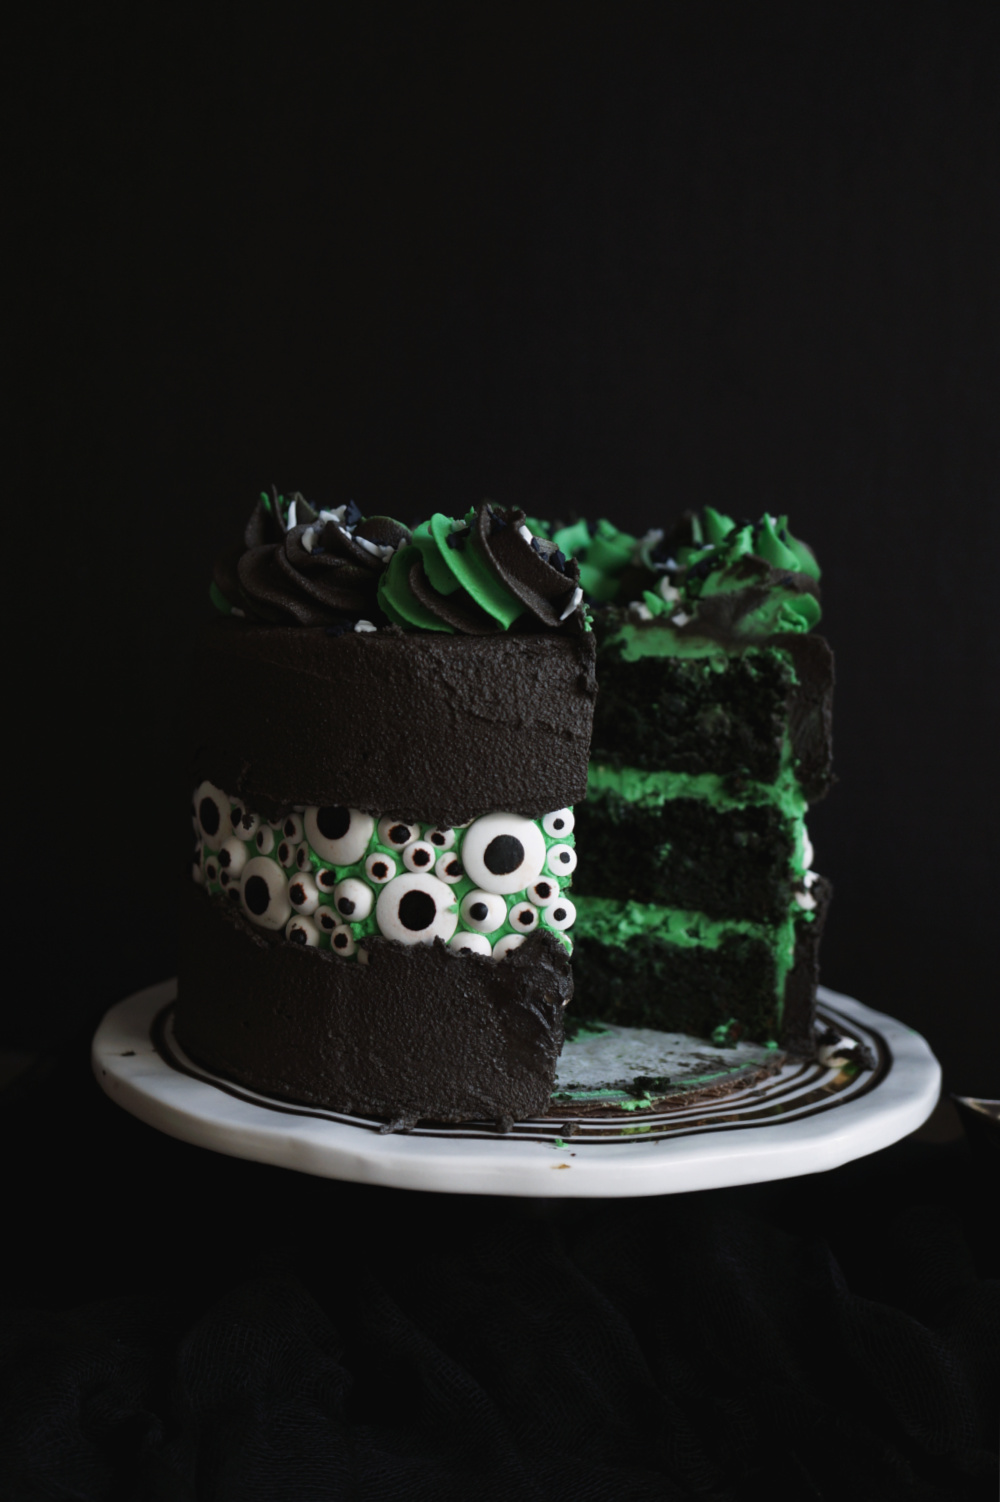
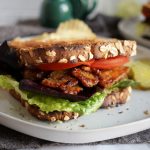
Get ready for Halloween with this fun Eyeball Fault Line Cake, made of vegan green velvet cake layers and covered with green vanilla and black chocolate frosting. A layer of candy eyeballs peeking through makes this cake extra special!

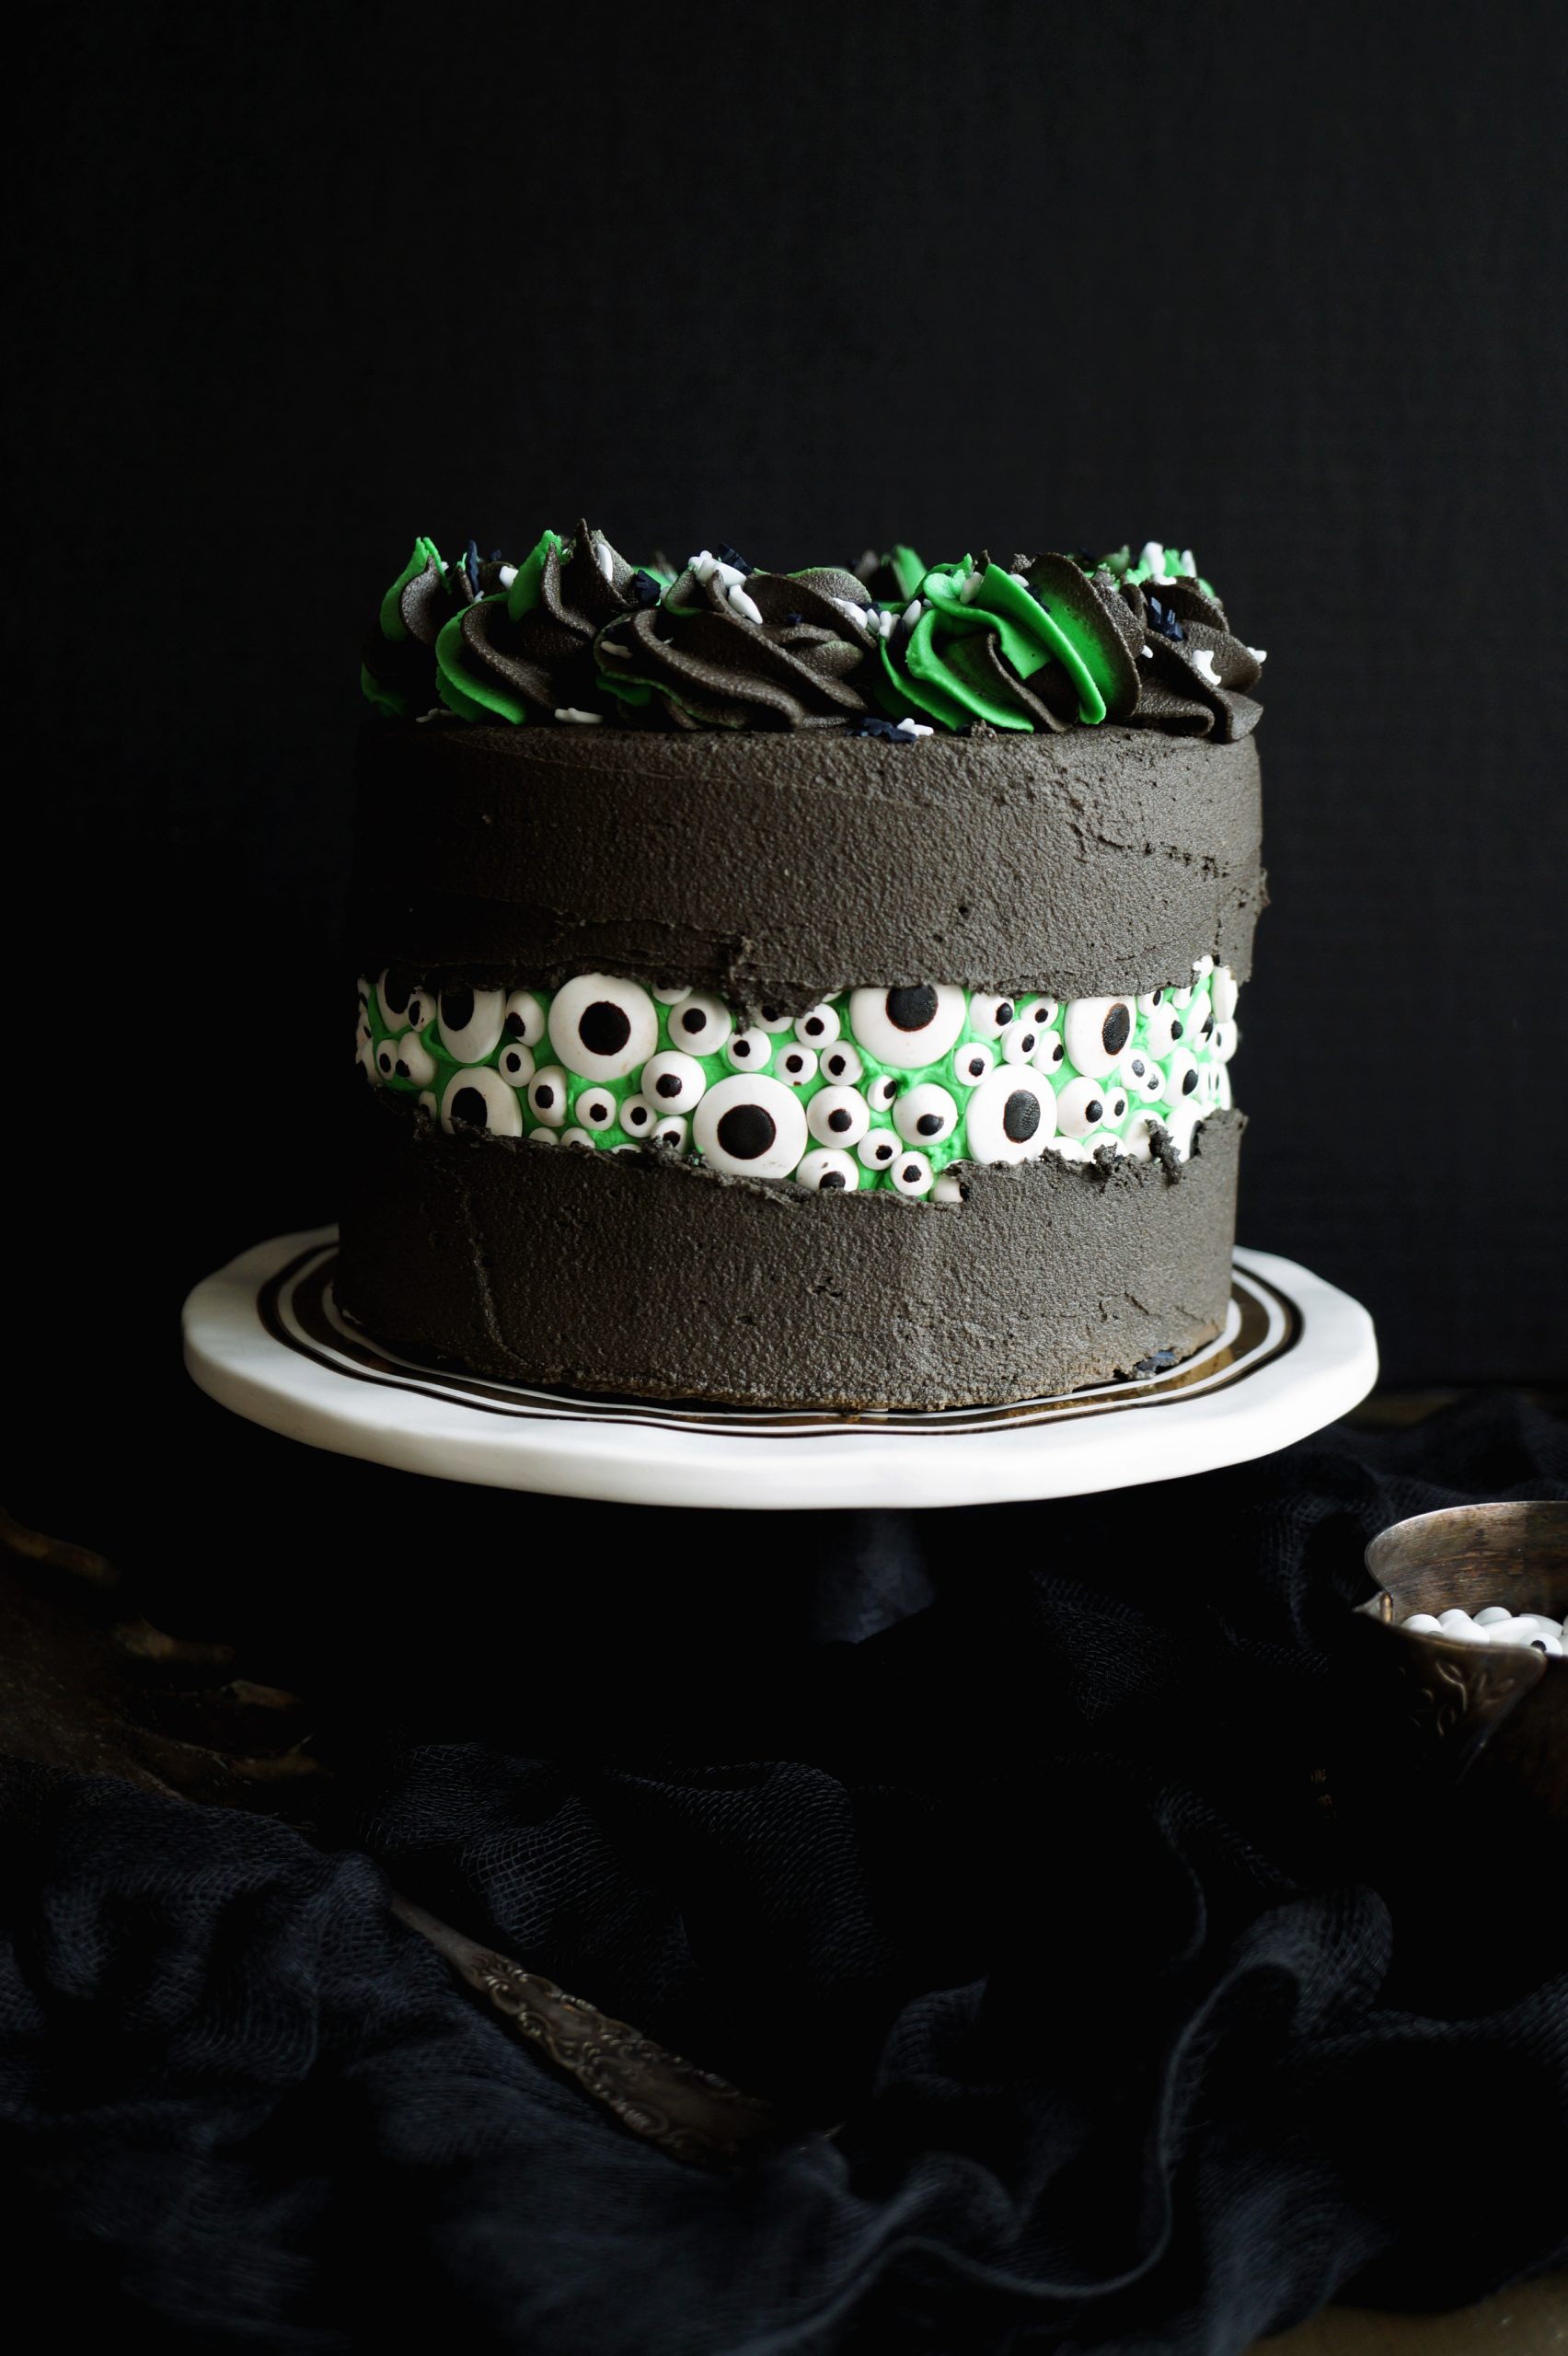
Happy Thursday, you guys! I am seriously having way too much fun with this #SpookyOctober series, and I am so excited about this new cake today. Say hello to this Eyeball Fault Line Cake! The flavor inside is vegan green velvet, covered in green vanilla frosting & black chocolate frosting. The best part of the whole thing is, of course, all the candy eyeballs! This cake is so fun and perfect to celebrate Halloween.
So my mission this month is to share at least one spooky treat a week, if not more! We are already halfway through the month and I still have so much I want to make and share with you! After my fun marshmallow spiderweb cake last week, it was time to shine the spotlight on this eyeball fault line cake. You may remember I also made a fault line Halloween cake last year too! It's not in my usual decorating style, but it is so fun to experiment with silly recipes and different techniques this time of year. I actually made a video of me decorating this cake so you can see exactly how I did it. No surprise - just sticking the eyeballs on was the longest part! 😉
What kind of equipment do I need for this eyeball fault line cake?
I know this cake may seem advanced, but honestly you don't need much besides the basic cake decorating tools!
- 6" cake pans - pretty much all of my cakes are 6". I recommend buying at least two, if not three, so you can bake them all at the same time. I worked with just two pans for years, but I recently bought a third and I feel like they bake up much better and more consistently with less batter in the pans.
- Cake decorating turntable - a must for those smooth cake sides! I have an ancient one from Target (back from when they had a Cake Boss line - LOL) but any will do. Don't feel like you have to buy a super expensive one, especially to start. As long as it spins and it's stable, it will work!
- Cake scraper - the other part of the equation when smoothing out the frosting. My cakes are not terribly tall and I find that my 6" scraper is tall enough 99% of the time! Again, same thing here - you don't have to get a super fancy one. I do prefer metal scrapers over plastic though, the metal is more sturdy and easier to control. The plastic ones can be flimsy!
- Open star decorating tip - my favoritest decorating tip! I use this for most of my decorating cause I love the look. I thought the dainty puffs of frosting on top would be a nice contrast to the spooky eyeballs.
- Decorating bags - the basic plastic disposable bags are useful, but I also have a big 16" Ateco reusable bag and it is my FAVORITE. So great for when you're decorating a big batch of cupcakes or other larger jobs. With cakes like this, generally I use it without a tip to help me cover the sides with frosting. Then I add in a tip and decorate the top.
Do I need any special ingredients for this cake?
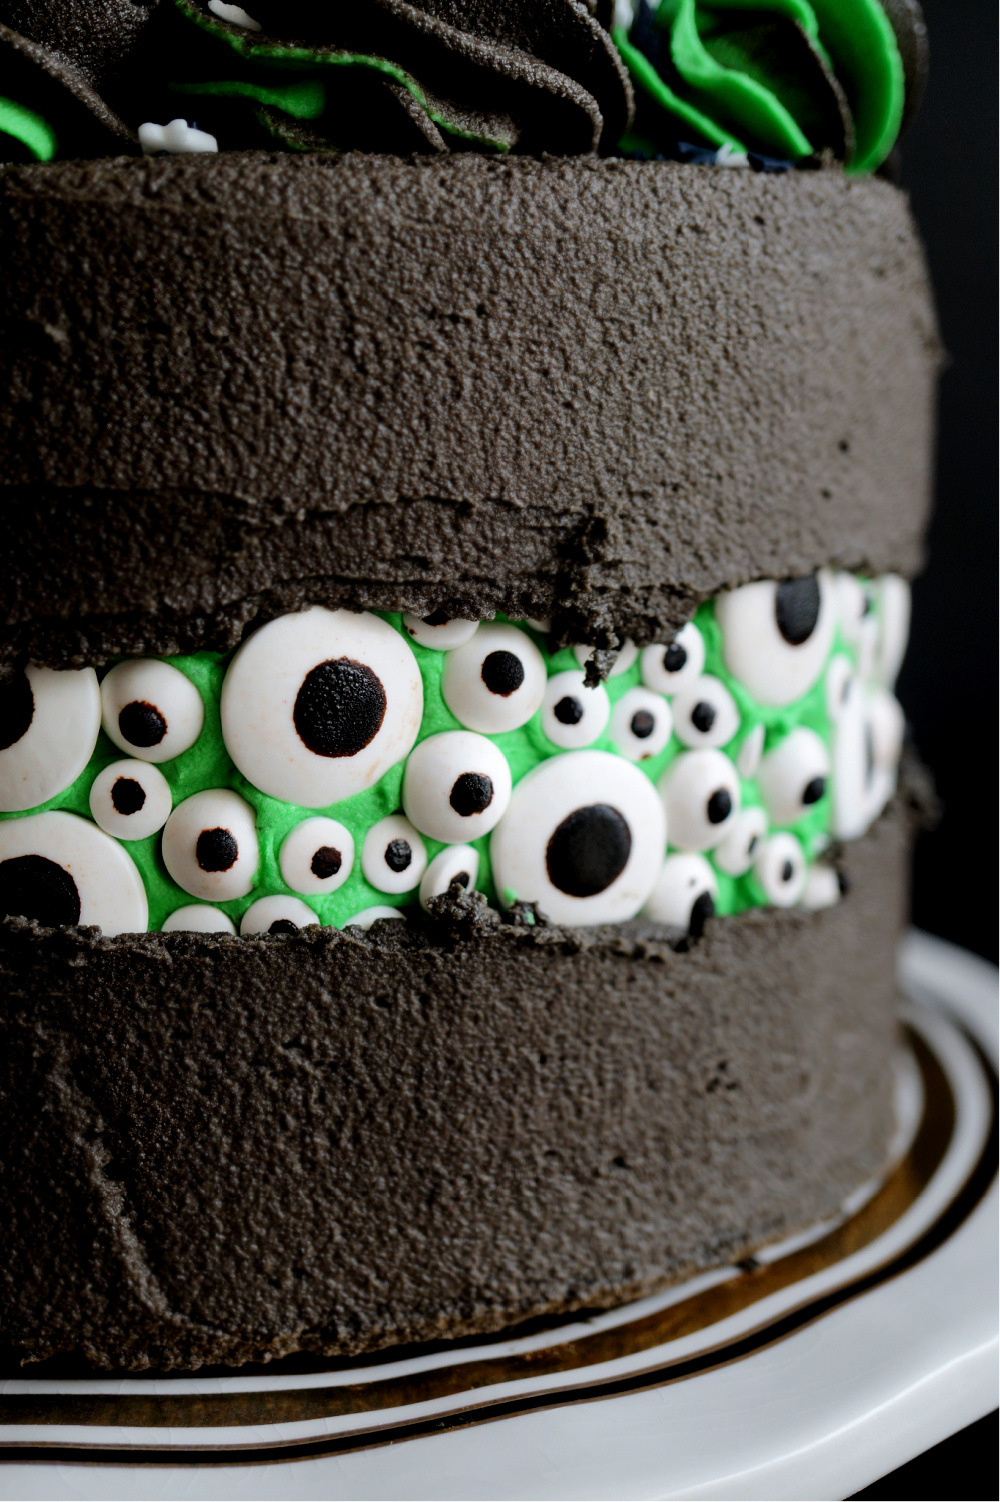
- Candy eyeballs - I mean... of course 😂 I just used the regular Wilton ones from the grocery store which do contain confectioner's glaze so they are technically not vegan. I loved the idea too much to let it go, so I just went with it and didn't eat the eyes when I ate the cake. If you are super dedicated, you can make them from scratch using this recipe from Fork and Beans!
- Green and black food coloring - you will need green food coloring for the cake and the frosting, as well as some black to add to the chocolate frosting!
- Dark cocoa powder - I mentioned it with my last cake as well, but starting with dark cocoa powder means less black food coloring to add to achieve a true black!
I hope you guys will give this eyeball fault line cake a try for a fun halloween baking project! I loved making this cake and I am obsessed with how it came out. The black and green together are a perfect match!
Looking for more spooky Halloween treats?
- Vegan Marshmallow Spiderweb Cake
- Vegan Halloween Cookies & Creme Fault Line Cake
- Black Chocolate Cupcakes with Green Slime
- Vegan Pumpkin Cupcakes with Two Tiered Halloween Frosting
eyeball fault line cake {vegan green velvet}
Ingredients
- *for the cake*
- 2 tablespoon ground flaxseed + 6 tablespoon water
- 1 cup granulated sugar
- 1⅔ + 1 tablespoon cup all-purpose flour
- 1 tablespoon cocoa powder
- 1½ teaspoon baking powder
- 1 teaspoon baking soda
- ½ teaspoon salt
- ¼ cup vegan butter at room temperature
- ⅓ cup nondairy yogurt
- ¼ cup vegetable oil
- 1 tablespoon vanilla extract
- ⅔ cup nondairy milk
- 1 cup vegan chocolate chips
- 1-2 tablespoon green food coloring for desired color
- *for the frosting*
- 1 cup shortening
- 1 cup vegan butter
- 4 cups powdered sugar
- 1 tablespoon vanilla bean paste or vanilla extract
- 1-2 tablespoon of nondairy milk as needed
- pinch of salt
- black food coloring and green food coloring
- candy eyeballs
Instructions
- First, make the cake. Preheat oven to 350F and spray three 6" round cake pans with nonstick baking spray.
- In a small bowl, whisk together the ground flaxseed with the water and set aside to thicken.
- In the bowl of a stand mixer, combine the flour, cocoa powder, baking powder, baking soda, salt, and sugar.
- Add in the vegan butter, and beat on low until it's incorporated and has a sandy texture.
- In a small bowl, whisk together the oil, flaxseed mixture, nondairy yogurt, and vanilla extract, and add them to the dry ingredients. Mix until combined.
- Pour in the nondairy milk, and beat on medium-low until smooth and creamy. Add food coloring until you reach your desired color (I was generous as I was worried the color would fade with cooking!).
- Divide batter evenly among the 3 pans, and bake for 30-35 minutes until cake is set in the center and a toothpick comes out clean.
- When the cakes are completely cooled, you can make the frosting. In the bowl of a stand mixer, beat the shortening, vegan butter, and vanilla extract together until completely smooth and creamy. Add in the powdered sugar, 1 cup at a time, until a thick frosting forms. Add in the salt. It is normal to need to add 1-2 tablespoon of milk to get the right consistency.
- Transfer about ½ of the frosting to a separate bowl, and add about 1 tablespoon of cocoa powder. Mix to combine, and add in the black food coloring until you have reached your desired color. You may need to add a little nondairy milk if it is too thick.
- To the original frosting, add green food coloring until you reach your desired color.
- Now, you can assemble your cake. First, trim off the tops of your cakes if they are domed or uneven.
- Place one cake on your cake stand or platter, and spread some green frosting on top. Repeat with all.
- Next, cover the cake with a thin layer of green frosting for the crumb coat. Cover the cake, being sure to fill in any gaps between the layers. Use a bench scraper to remove any excess (remember we want this layer to be pretty thin). Around the middle of the cake (or wherever you would like your "fault line," spread a thicker layer of the green frosting. This is where we will stick the candy eyeballs. Gently press on the eyeballs in this frosted area to create the fault line effect.
- Now, chill your cake for at least 15-20 minutes so the green frosting can solidify.
- For the final frosting of the cake, spoon your black frosting in a piping bag and pipe a thick layer all around the cake, avoiding the area where you have placed the eyeballs. Spread some black frosting to the top as well.
- Very carefully and gently use your bench scraper to smooth out your black frosting, removing some excess and creating uneven edges at the fault line. Be gentle as you don't want to scrape so much black frosting off that the green frosting comes through.
- For the top, we are going to make a swirl using our leftover green and black frosting. Place a large piece of plastic wrap on your counter, and spread the black and green frosting on it side by side (think like two long/fat ropes next to each other). Roll it up into a sausage and twirl the ends tightly. Prepare a piping bag with your desired decorating tip. Cut one of the "twirly ends" off of your frosting sausage, and carefully place it into your prepared piping bag with decorating tip. Now as you squeeze the bag, you should get both colors coming from the plastic wrap! Pipe decorations as desired on top of your cake and top with sprinkles if desired.
- Serve cake immediately or refrigerate until needed - do note that I noticed the blacks of the candy eyeballs started to spread due to condensation so be careful!
*Disclosure: I am part of the Amazon Associates Program, and there may be affiliate links on this page. If you buy anything through my website, I will receive a small percentage of the profit at no extra cost to you. Thank you for supporting my blog!*


Olivia says
Hey! I love the decoration for this cake. And the cakes turned out super moist. I’m decorating it now (just about to add the black frosting), but I never got happy with the consistency of the buttercream. I’m used to regular American buttercream, and no matter what I did (more powdered sugar, putting it in the fridge) it still seemed loose… I’m thinking maybe it was the brand of vegan butter, but do you have any thoughts?
valentina says
Hi Olivia! I am sorry to hear that! Some brands of vegan butter do contain more water so they tend to make the frosting more runny. If you find that 50/50 shortening and butter is not sufficient, you can always increase the amount of shortening as that will help make the frosting more sturdy! Also, it's a bit hard to find, but if you're able to purchase unsalted vegan butter that helps as well. Salted butter tends to be more runny due to the addition of salt in the mix. Hope that helps!