
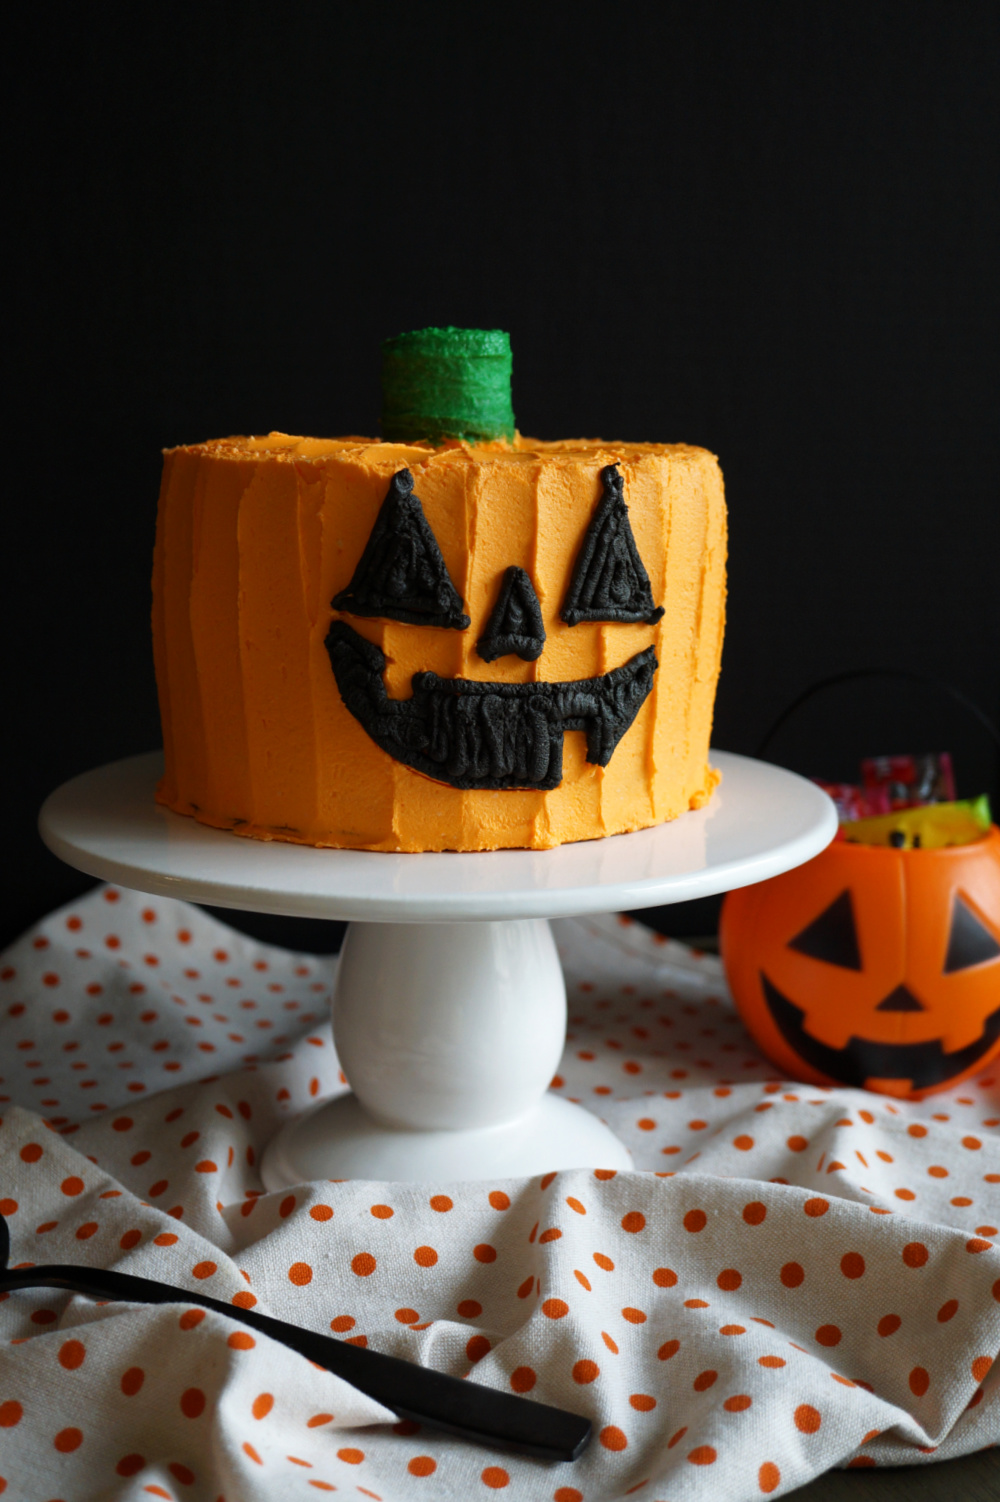
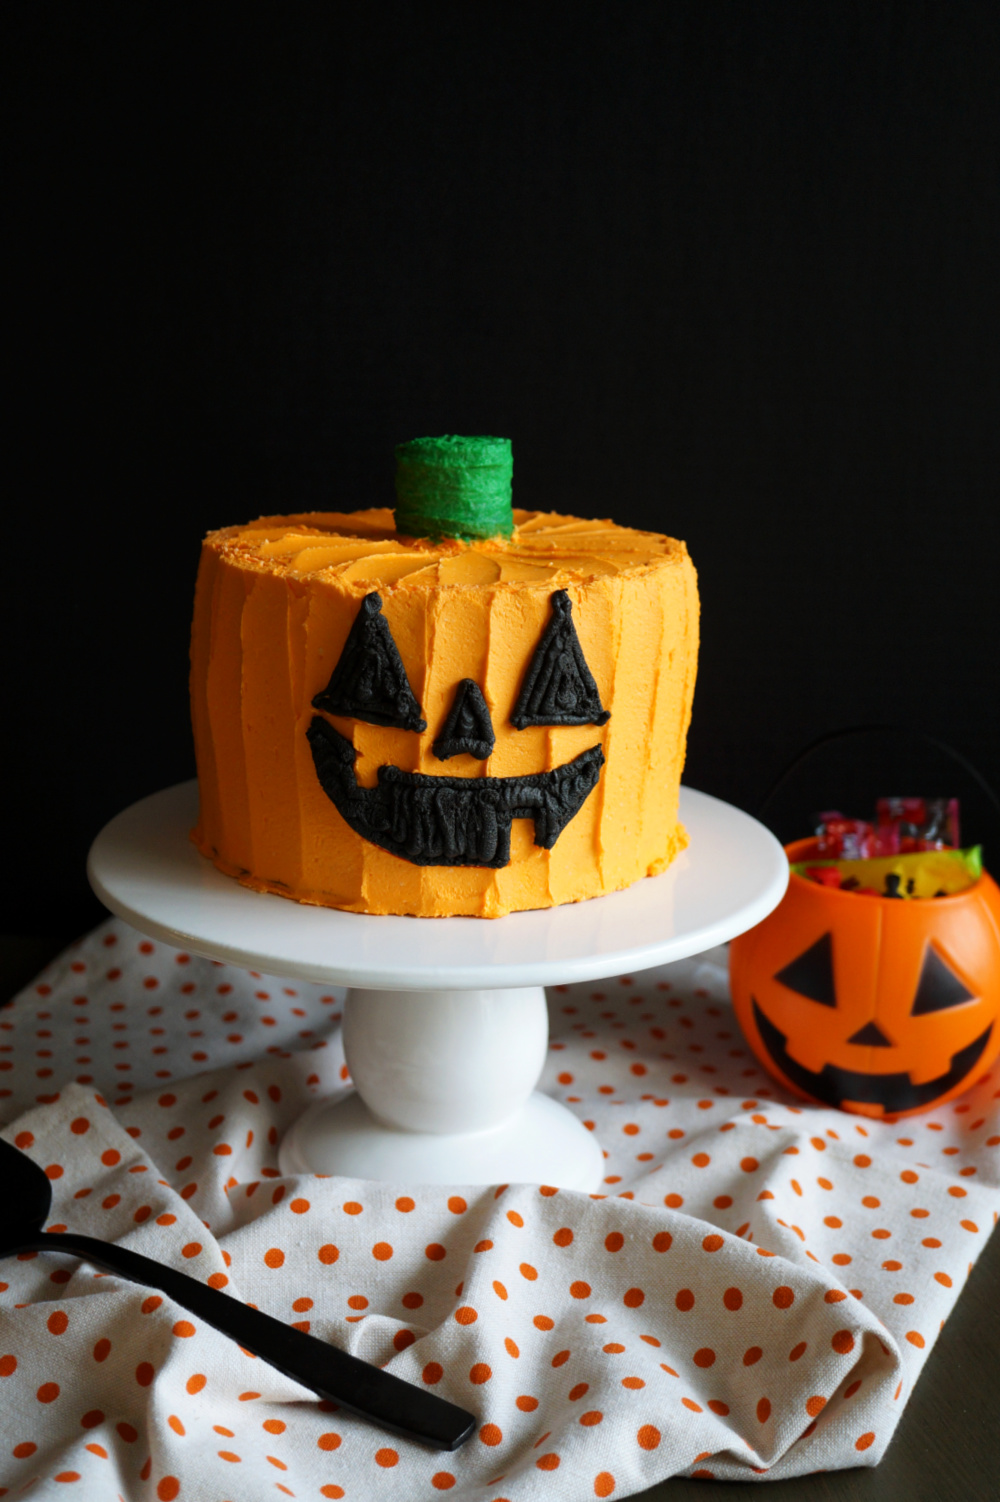
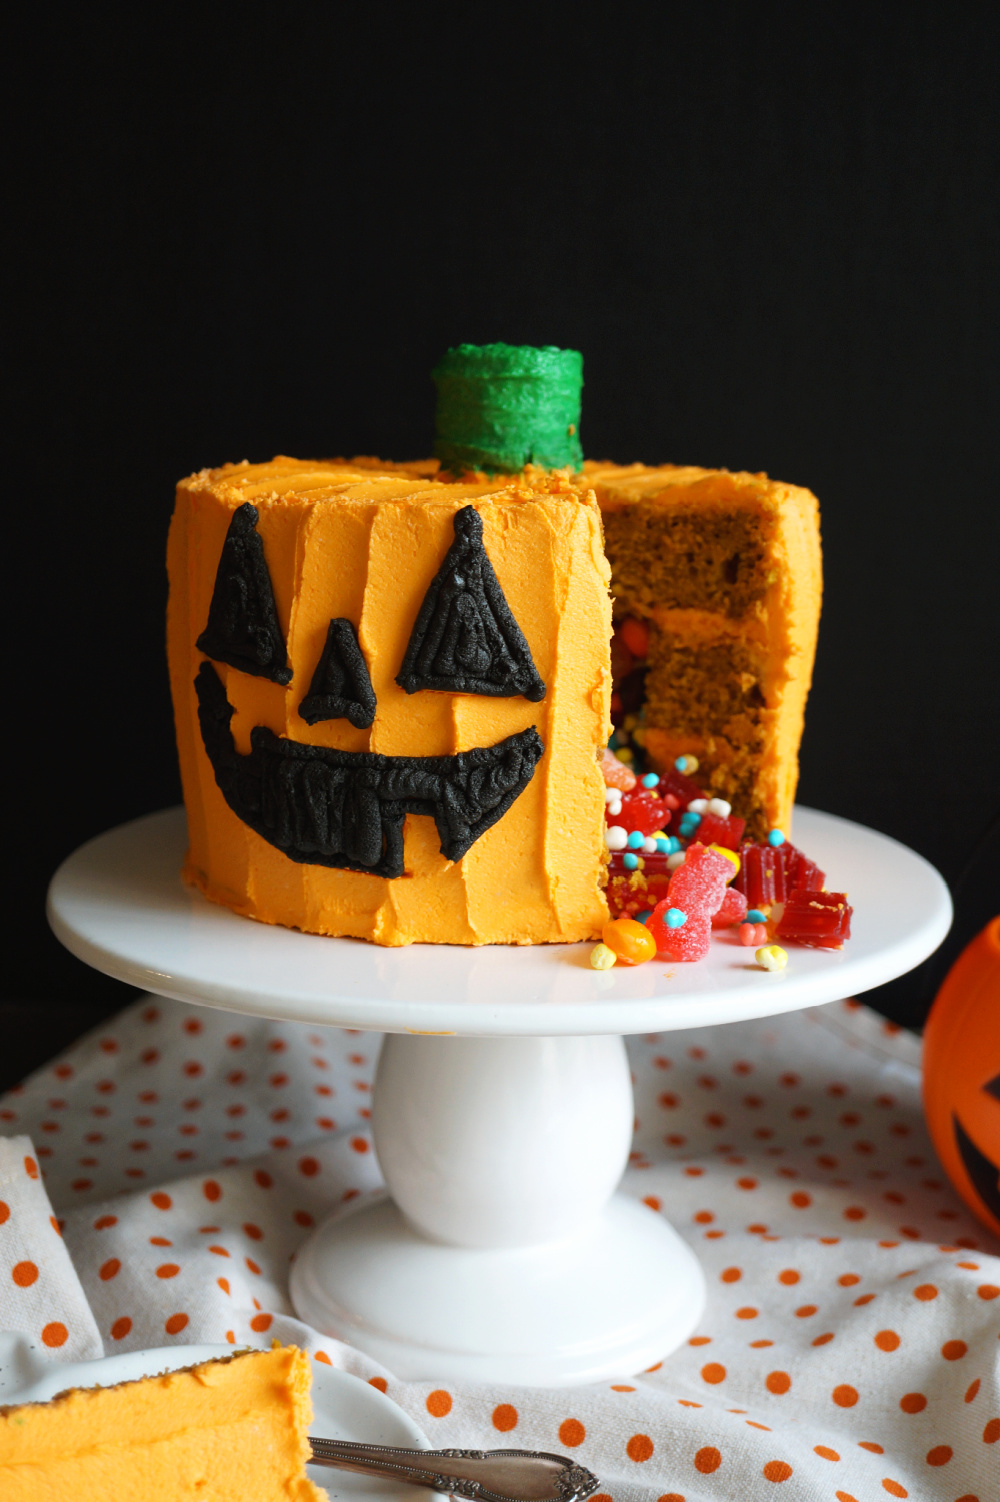
Celebrate Halloween with this fun Candy-Filled Jack O'Lantern Cake! Pumpkin cake is decorated with a funny face and filled with assorted candies for a sweet surprise!

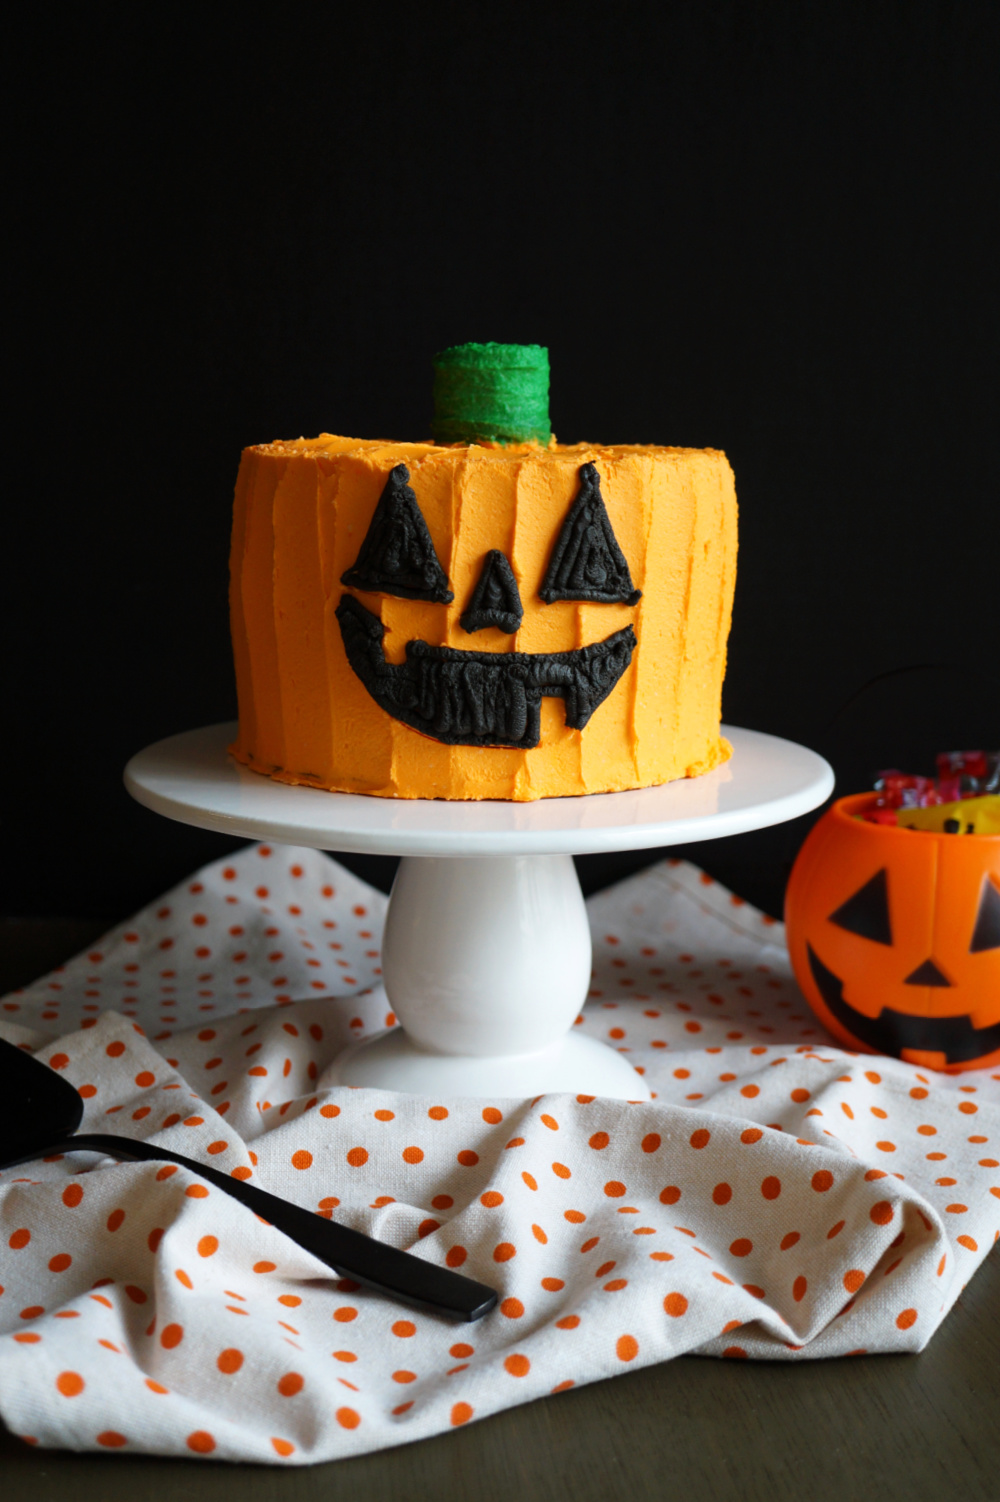
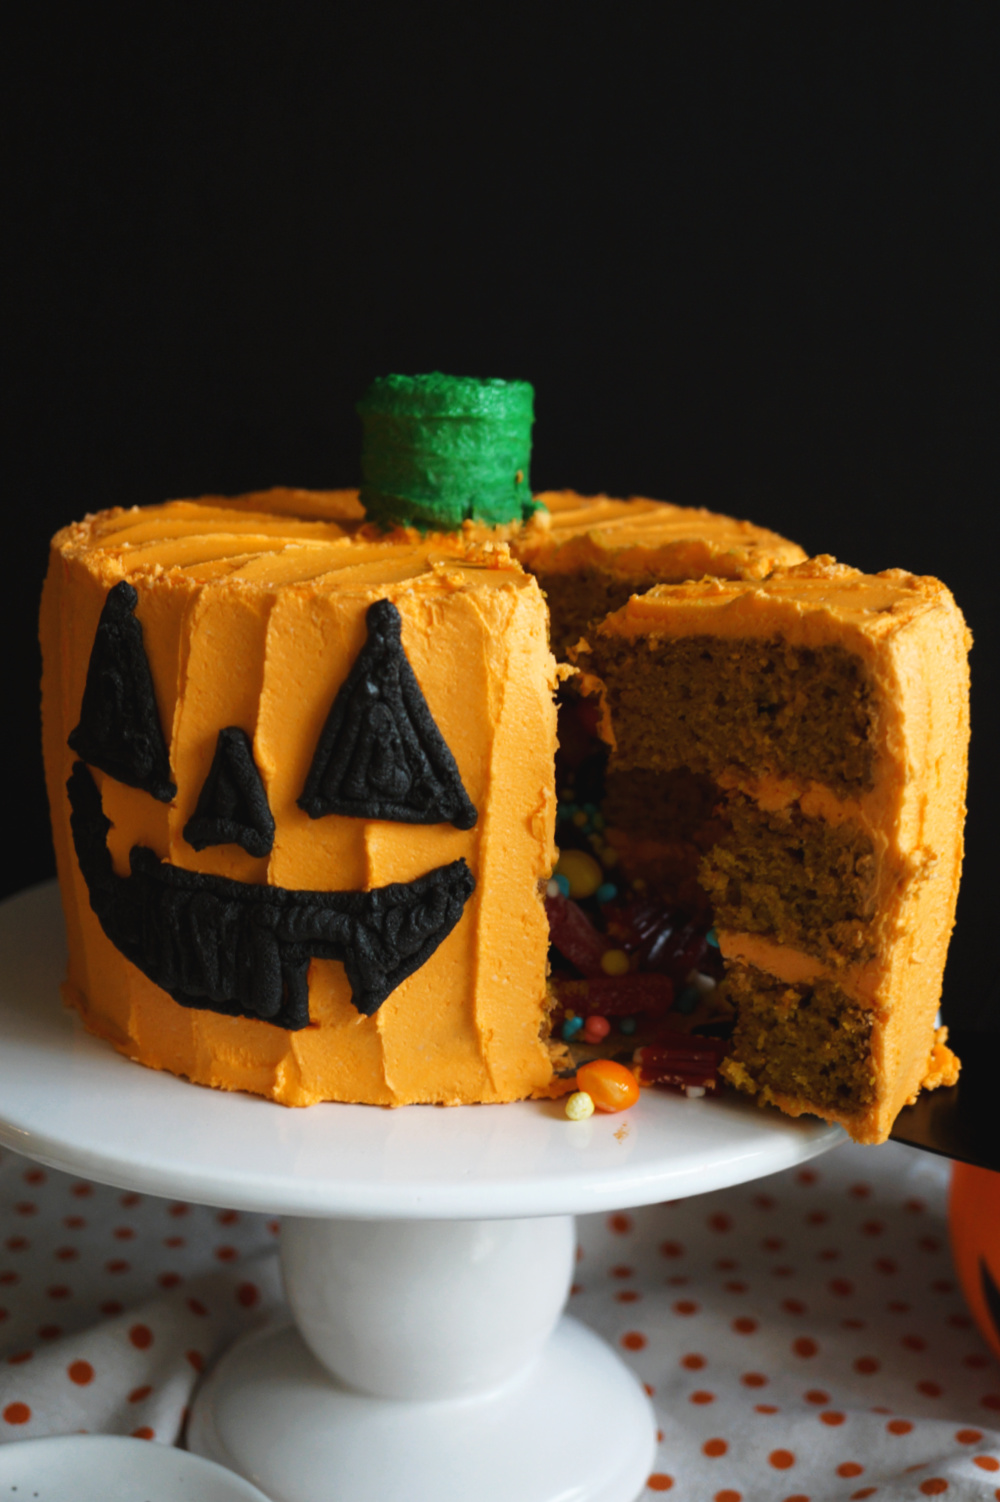
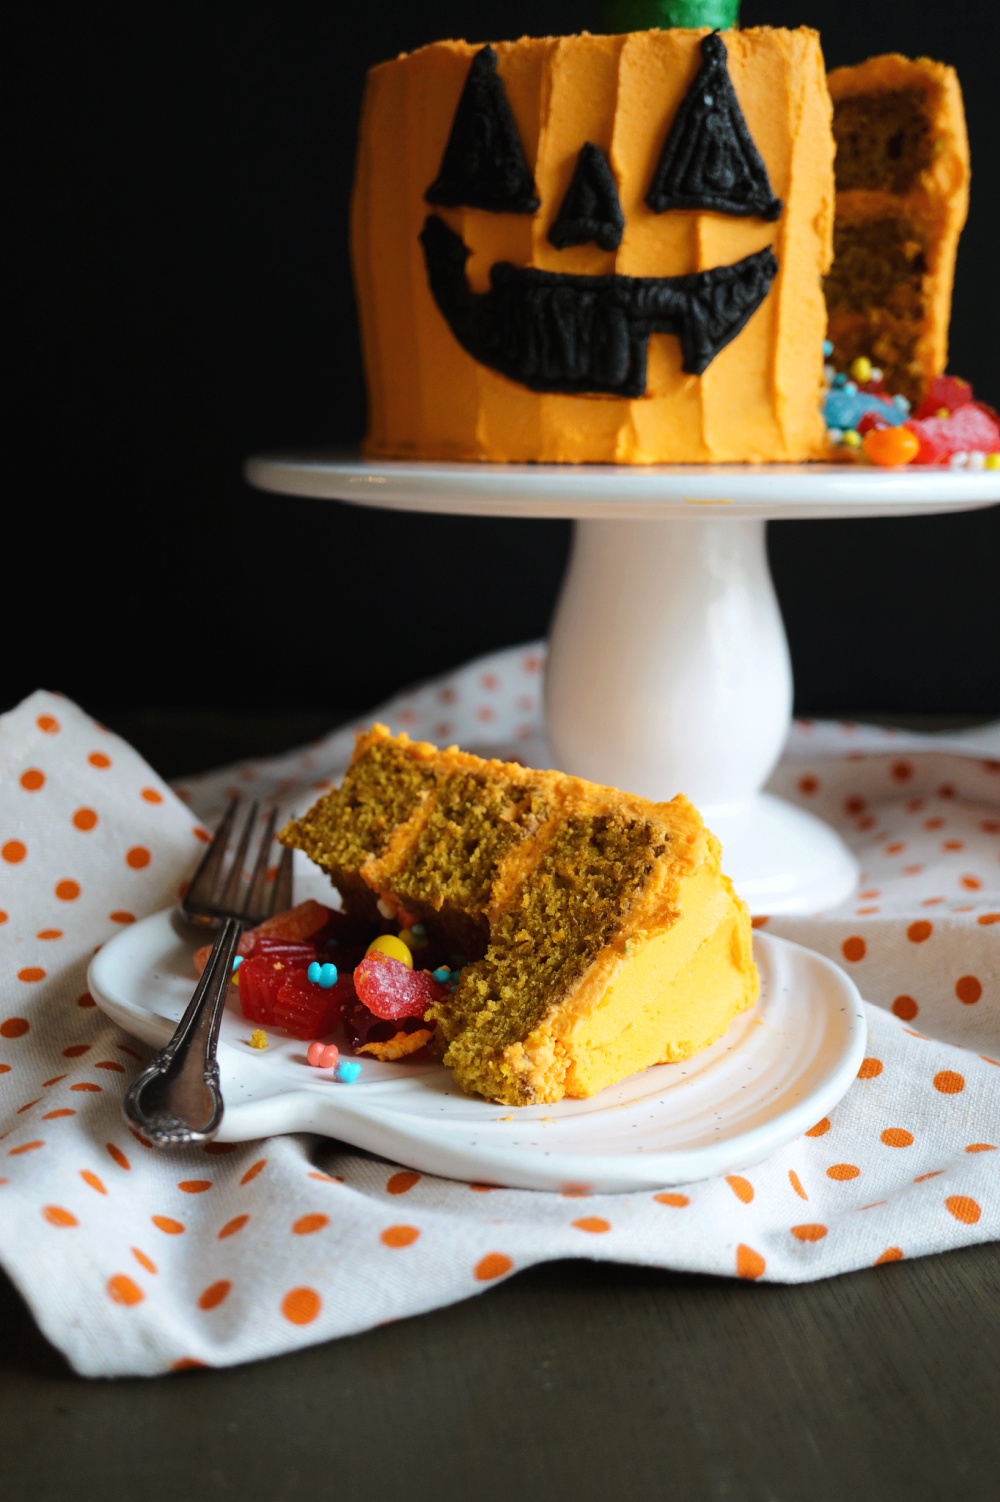
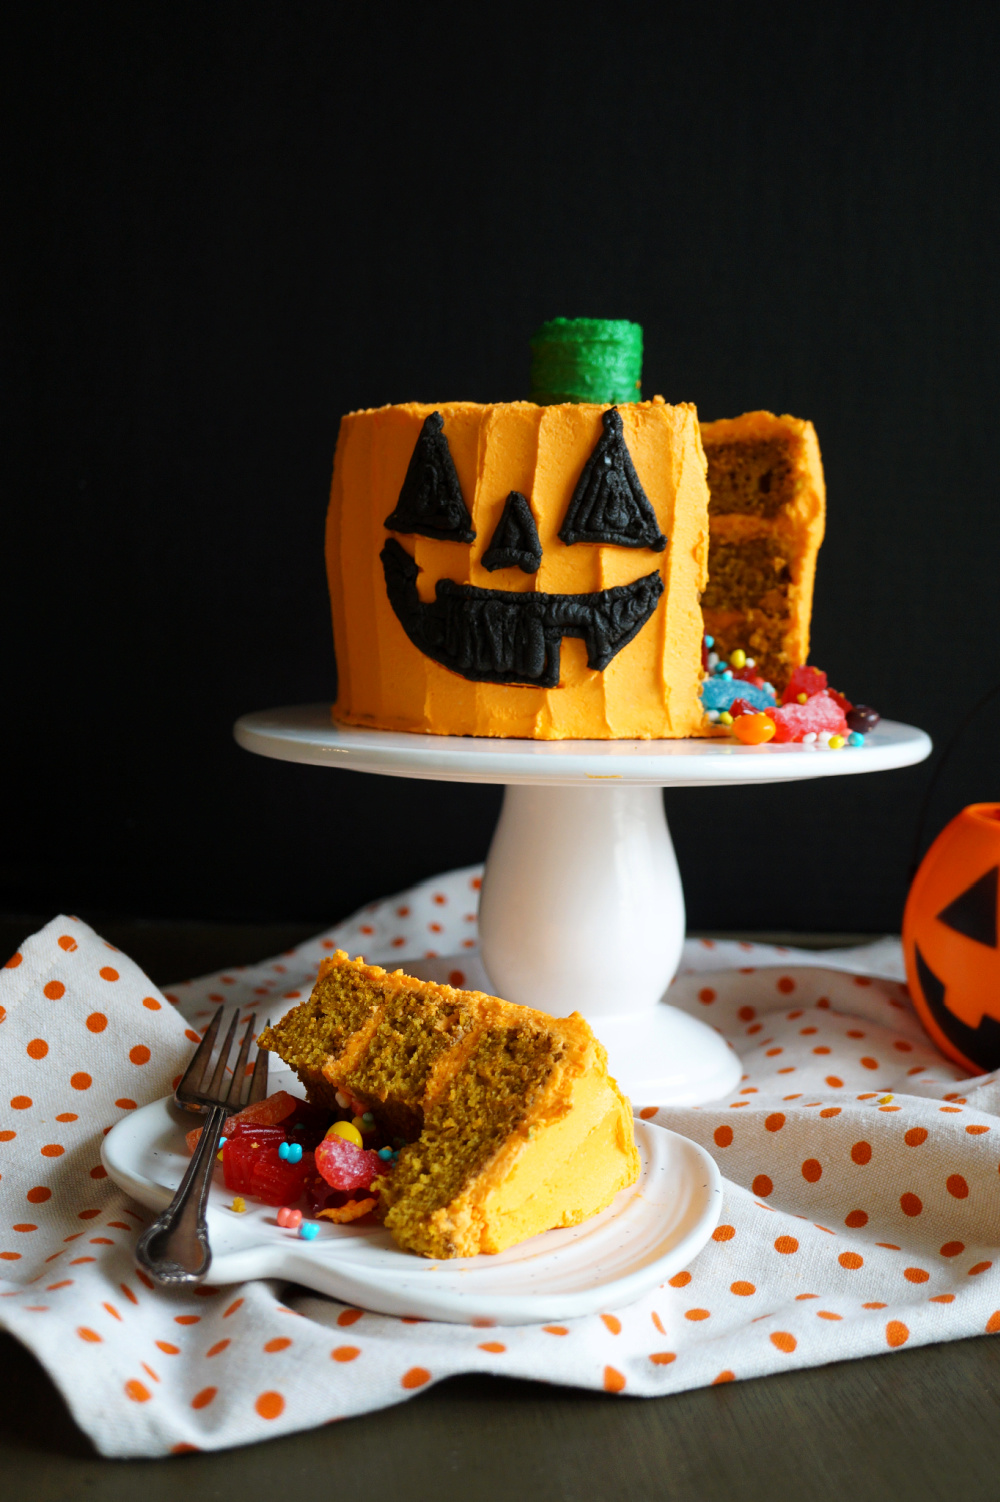
Happy Thursday, my lovely friends! Halloween is SO close and I am excited to share this last #SpookyOctober recipe with y'all today. This Candy-Filled Jack O'Lantern Cake may not be as ghoulish as a cobweb-covered cake, or an eyeball cake, or bloody-looking cupcakes but... it sure is fun! This treat is made of layers of fluffy pumpkin spice cake, carved out and filled with candy, and then decorated with frosting to look like the classic jack o'lantern. The secret candy makes for a sweet surprise when you cut into the cake!
When I was brainstorming all of my Halloween creations for this year, I just knew this Jack O'Lantern cake had to be the grand finale to the month! What could be better than a cake that looks like a candy pail... actually filled with candy?! You'd be surprised at how easy it is to make a piñata cake like this one though. I did take a video so you can see everything step by step, but basically you just bake up your cake layers as normal and then cut out the middle of the bottom two cakes. I used a cookie cutter but you could even use a cup or trace with a knife. Then as I built the cake, I just filled the resulting cavity with candy before adding the top (whole) cake layer and sealing the whole thing with frosting!
What do I need to make this Jack O'Lantern Cake?
While this cake looks impressive, the supplies are really no different than a regular cake!
- 6" cake pans: six inch cakes are my go-to for these blog recipes, especially the more intricate designs. They are the perfect size!
- Round cookie cutter: I used a circular cookie cutter to make my cake cavities which made everything super easy and consistent. The size I used is 3 ¼ inches. You could easily use another circular object like a cup or jar to make the hole, or trace it with a knife!
- Large offset spatula: the small offset spatula is my go-to for everyday cake decorating, but in this case I used an XL spatula to make the stripes on the sides and top of the cake. This made it so easy!
- Small round piping tip: I used a round piping tip to trace and fill the jack o'lantern face on the front of the cake!
Do I need any special ingredients?
You sure don't! The ingredient lineup is pretty basic for this jack o'lantern cake. Since the whole theme is pumpkin... of course the cake itself had to be pumpkin spice!
- Pumpkin puree: a must in all pumpkin baked goods! Be sure to buy plain puree and not pumpkin pie filling.
- Brown sugar: I love using brown sugar in place of regular white sugar when baking with pumpkin as it delivers a more caramelized, deeper flavor. Yum!
- Pumpkin pie spice mix: also a must - a nice blend of all the core pumpkin pie spices makes baking much easier and more convenient! A mix will usually include cinnamon with nutmeg, cloves, ginger, and sometimes allspice. If you don't have any, you can just substitute with plain cinnamon.
- Vanilla extract: you can't miss this in baked goods (and especially in the vanilla frosting) for a creamy, sweet flavor. It just makes everything better!
- Bonus - pumpkin spice extract: this is optional! I've just started to bake with it this year and WOW, it is a game changer. It adds so much flavor without being overpowering.
- Vegetable oil: my favorite for baking for its plain unobtrusive flavor (and crazy cheap price tag)!
- Nondairy milk: any unsweetened plant milk will do! I usually bake with almond or cashew since that's what I keep in the house.
- All-purpose flour, baking powder, baking soda, salt.
I hope you guys liked this candy-filled jack o'lantern cake! It was so fun to make. I have enjoyed this month of treat making so much and I hope you have as well. This year has been a doozy but hopefully these silly cakes brought a smile to your face 🙂
Check out my previous #SpookyOctober creations:
- Vegan Marshmallow Spiderweb Cake
- Vegan Eyeball Fault Line Cake
- Vegan Cherry Pie Vampire Cupcakes
- Vampire's Kiss Cocktail {Cherry Lime Kombucha Sour}
- Vegan Dirt & Worms Cake

candy-filled jack o'lantern cake
Ingredients
- *for the cake*
- 1 cup pumpkin puree
- ⅓ cup vegetable oil
- ¾ cup packed brown sugar
- ¾ cup nondairy milk
- 2 cups all-purpose flour
- 1 teaspoon baking soda
- 2 teaspoon baking powder
- pinch of salt
- ½ teaspoon pumpkin pie spice mix
- 1 teaspoon vanilla extract
- optional: ½ teaspoon pumpkin spice extract
- *for the frosting*
- ½ cup shortening
- ½ cup vegan butter
- 3 cups powdered sugar
- 1 teaspoon vanilla extract
- 2-3 tablespoon nondairy milk as needed
- orange green, and black food coloring
- *for filling: candy as desired*
Instructions
- First, prepare the cakes. Preheat oven to 350F. Spray three 6" cake pans with baking spray, and set aside.
- In a large bowl, whisk together the pumpkin, oil, brown sugar, and milk until combined.
- Add in the flour, baking soda, baking powder, salt, pumpkin spice mix, and vanilla (plus pumpkin spice extract if using). Mix until the cake batter comes together.
- Divide batter evenly between the three cake pans, and bake for 30-35 minutes, until a toothpick inserted in the center comes out clean. Let cool slightly in the pans, then remove and transfer to a rack to finish cooling off. Cakes must be completely cooled before they can be frosted. I recommend wrapping them in plastic wrap and letting them rest in the fridge overnight for easier frosting and stacking!
- When ready to assemble, make the frosting. In the bowl of a stand mixer fitted with the paddle, beat together the shortening and vegan butter until smooth and creamy. Add in the vanilla.
- Mix in the powdered sugar ½ cup at a time until a thick frosting forms. It is normal to have to add 2-3 tablespoon of milk to get the frosting to the right consistency. You want it to be soft but still hold its shape.
- Set aside a few spoonfuls of frosting into separate bowls to make some green frosting (for the stem) and black (for the face). Add orange food coloring to the rest for the cake.
- To assemble, first level the cakes if needed so they are all flat and even. Using a 3" circular cookie cutter (or any similar round object), cut out the center of TWO of the cakes.
- Spread a small bit of frosting on your cake board or plate, and place one of the cakes with a hole on it. Spread more frosting along the top of this cake, and set the second cake with the hole on top.
- Fill the resulting cavity with your desired candy. Finally, spoon or pipe frosting on top of the cake and place the remaining (whole) cake on top. Cover the entire cake generously with orange frosting.
- To make the striped effect, I used an extra large spatula and gently dragged it upwards on the sides of the cake.
- To make the stem on top, take some of the cake scraps you cut from the middle and cut it into a smaller cylinder (about 1.5 inches). Gently frost the stem using the green frosting you set aside, and set it atop the cake.
- Finally, to make the face. I drew and cut out the shapes on a piece of paper, and stuck them to my cake using a toothpick. Using a knife, gently trace around your shapes to make an indentation in the frosting. Remove the paper guides, and now you can fill your drawn shapes with the black frosting. I used a Wilton #5 round tip for this part.
- That's it! Refrigerate cake until you are ready to eat. Do note that sugar-covered candies (like sour patch kids, skittles, M&M's) will start to stick to each other due to the condensation melting the sugar a little.
*Disclosure: I am part of the Amazon Associates Program, and there may be affiliate links on this page. If you buy anything through my website, I will receive a small percentage of the profit at no extra cost to you. Thank you for supporting my blog!*


Leave a Reply